目录
1.关于路由模式问题
默认是hash模式,此模式下的路由会带有#/的形式;
可将mode改成history,此时路由的#便会取消,但此模式需要后台配置
2.如何注册全局组件
toast.js
1
2
3
4
5
6
7
8
9
10
11
12
13
14
15
16
17
18
19
20
21
22
23
24
25
26
27
28
29
30
import Component from '';

const Toast = {};

// 注册Toast
Toast.install = function (Vue) {
    // 生成一个Vue的子类
    // 同时这个子类也就是组件
    const ToastConstructor = Vue.extend(Component)
    // 生成一个该子类的实例
    const instance = new ToastConstructor();

    // 将这个实例挂载在新创建的div上
    // 并将此div加入全局挂载点内部
    instance.$mount(document.createElement('div'))
    document.body.appendChild(instance.$el)

    // 通过Vue的原型注册一个方法
    // 让所有实例共享这个方法
    Vue.prototype.$toast = (msg, duration = 1500) => {
        instance.message = msg;
        instance.visible = true;

        setTimeout(() => {
            instance.visible = false;
        }, duration);
    }
}

export default Toast;
main.js
1
2
import Toast from ''
Vue.use(Toast)
在组件内this.$toast("")即可
3.局部注册只允许输入数字的组件
demo.vue
1
2
3
4
5
6
7
8
9
10
11
12
13
14
15
16
17
18
19
20
21
22
<template>
    <div>
        <input type="text" v-number-only>
    </div>
</template>
<script>
    export default{
        directives: {
            numberOnly: {
                bind: function(el) {
                    el.handler = function() {
                    el.value = el.value.replace(/\D+/, "");
                    };
                    el.addEventListener("input", el.handler);
                },
                unbind: function(el) {
                    el.removeEventListener("input", el.handler);
                }
            }
        }
    }
</script>
4.封装http请求
http.js
1
2
3
4
5
6
7
8
9
10
11
12
13
14
15
16
17
18
19
20
21
22
23
24
25
26
27
28
29
30
31
32
33
34
35
36
37
38
39
40
41
42
43
44
45
46
47
48
49
50
51
52
53
54
55
56
57
58
59
60
import axios from 'axios'
import qs from 'qs'

export function Get(url, data) {
    return new Promise((resolve, reject) => {
        axios.get(url, {
            params: data
        }).then((res) => {
            if (res) {
                if (res.status == 200) {
                    resolve(res.data.data);
                } else {
                    reject(res);
                }
            }
        }).catch((error) => {
            reject(error);
        })
    });
}

export function Post(url, data) {
    return new Promise((resolve, reject) => {
        axios.post(url, qs.stringify(data), {
            headers: {
                'Content-Type': 'application/x-www-form-urlencoded',
                'Accept': 'application/json'
            }
        }).then((res) => {
            if (res) {
                if (res.status == 200) {
                    resolve(res.data.data);
                } else {
                    reject(res);
                }
            }
        }).catch((error) => {
            reject(error);
        })
    });
}

export function PostFlie(url, data) {
    return new Promise((resolve, reject) => {
        //根据data对象生成FormData对象
        var temp = new FormData();
        for (var t in data) {
            temp.append(t, data[t]);
        }
        axios.post(url, temp).then((res) => {
            if (res.status == 200) {
                resolve(res.data.data);
            } else {
                reject(res);
            }
        }).catch((error) => {
            reject(error);
        })
    })
}
service.js
1
2
3
4
5
import { Get, Post,PostFlie } from './http'

export function Interface(data) {
    return Get('/url', data);
}
demo.vue
1
2
3
4
5
6
7
import { Interface } from "";

export default{
    mounted(){
        Interface(data).then(res => {});
    }
}
5.如何使用sass
安装sass的依赖包
# 使用save会在package.json中自动添加
cnpm i node-sass --save-dev
cnpm i sass-loader --save-dev
添加配置
build/webpack.base.conf.js
1
2
3
4
5
6
7
8
9
10
module: {
        rules: [
            //...默认及其他
            {
                test: /\.scss$/,
                loaders: ["style", "css", "sass"]
            }
        ]
    }
使用
 <style lang="scss">
 </style>
6.如何引用公共.scss文件
在app.vue中@import ''即可
7.如何解决vue开发模式下的跨域问题
如上,在请求上,我们的开发环境不仅仅面临要把接口的全路径写全的问题,还包括跨域问题等等。
所以要将接口地址通过代理的方式映射到本地,让我们的本地开发也可以使用相对根目录的方式请求接口。
config/index.js
1
2
3
4
5
6
7
8
9
10
proxyTable: {
      '/apitest': { //跨域接口请求标记
        target: 'https://cnodejs.org/api/v1', // 需要跨域请求接口的域名
        secure: false,      // 如果是https接口,需要配置这个参数
        changeOrigin: true,     // 如果接口跨域,需要进行这个参数配置
        pathRewrite: {
          '^/apitest': '' //把域名换成target,代理域名为空,请注意,pathRewrite下的代理域名一定要设置为空,否则会出现请求接口404的问题
          }
      }
    }
build/webpack.dev.conf.js
1
2
3
4
5
plugins: [
    new webpack.DefinePlugin({
      API_HOST:'"/apitest"' //设置全局变量 注意单双引号
    })
]
build/webpack.prod.conf.js
1
2
3
4
5
plugins: [
    new webpack.DefinePlugin({
      API_HOST:'"https://cnodejs.org/api/v1"' //设置全局变量
    })
]
build/webpack.dev.build.conf.js
1
2
3
4
5
plugins: [
    new webpack.DefinePlugin({
      API_HOST:'"https://cnodejs.org/api/v1"' //设置全局变量
    })
]
service.js
1
2
3
export function Interface(data) {
    return Get(API_HOST + '/topics', data);
}
8.项目打包后部署到服务器上打开一片空白,发现是文件引用路径错误问题
默认配置下,通过webpack+vuecli默认打包的css、js等资源,路径都是绝对的。
但当部署到带有文件夹的项目中,这种绝对路径就会出现问题,因为把配置的static文件夹当成了根路径,那么要解决这种问题,就得引用相对路径。
资源相对引用路径
config/index.js
背景图片的引用问题
上面虽然解决了资源路径的引用问题,但是资源里面的背景图片,不像index.html中加载资源一样,通过./static/js/app.js引用可以正常加载,图片资源是通过css加载的,如background: url("../../assets/images/logo.png");被相对打包后变成了url(static/img/logo.2f00bf2.png)所以我们要保留css引用图片的正常路径,即url(../../static/img/logo-.2f00bf2.png)
build/utils.js
1
2
3
4
5
return ExtractTextPlugin.extract({
    use: loaders,
    fallback: 'vue-style-loader',
    publicPath:'../../' //<--注意此处路径
})
9.解决在v-html时,里面的元素无法继承外部css的问题
v-html渲染的内容可以理解为其子组件内容,当style加上scoped属性时,就无法作用于v-html内绑定的内容。
方法一:直接去除scoped属性
方法二:在update()的生命周期内,通过js改变其css
方法三:如果不想去掉scoped属性,可以使用>>>操作符(深度作用选择器),顾名思义,它可以深度影响子组件的样式。例如:
demo.css
1
2
3
4
.demo-tabs-style2>>>.ivu-tabs.ivu-tabs-card > .ivu-tabs-bar .ivu-tabs-tab{
    border-radius: 0;
    background: #eeee00;
}
/deep/操作符取而代之。例如:
demo.scss
1
2
3
4
5
6
.demo-tabs-style2 {
  /deep/ .ivu-tabs.ivu-tabs-card {
    border-radius: 0;
    background: #eeee00;
  }
}
10.如何全局引入jquery
$ cnpm install jquery --save
build/webpack.base.conf.js
1
2
3
4
5
6
7
8
9
var webpack = require("webpack")
 //在module.exports的最后加入
plugins: [
    new webpack.optimize.CommonsChunkPlugin('common.js'),
    new webpack.ProvidePlugin({
        jQuery: "jquery",
        $: "jquery"
    })
   ]
重启 npm run dev
main.js
11.父子组件之间如何相互通信
1. 父组件直接调用子组件的方法
parent.vue
1
2
3
4
5
6
7
8
9
10
11
12
13
14
15
16
17
18
19
<template>
    <div>
        <h1>我是父组件</h1>
        <!-- 注意这里的ref -->
        <child ref="child"></child>
    </div>
</template>
<script>
    import child from './child'

    export default{
        components:{ child },//别忘了components
        methods:{
            parent(){
                this.$refs.child.childFn()
            }
        }
    }
</script>
child.vue
1
2
3
4
5
6
7
8
9
10
11
12
13
14
<template>
    <div>
       <h2>我是子组件</h2>
    </div>
</template>
<script>
    export default{
        methods:{
            childFn(){
                alert('父组件调用了我')
            }
        }
    }
</script>
2. 子组件直接调用父组件的方法
parent.vue
1
2
3
4
5
6
7
8
9
10
11
12
13
14
15
16
17
18
<template>
    <div>
        <h1>我是父组件</h1>
        <child @parentFn="parent"></child>
    </div>
</template>
<script>
    import child from './child'

    export default{
        components:{ child },
        methods:{
            parent(){
                //something
            }
        }
    }
</script>
child.vue
1
2
3
4
5
6
7
8
9
10
11
12
13
14
<template>
    <div>
       <h2>我是子组件</h2>
    </div>
</template>
<script>
    export default{
        methods:{
            childFn(){
                this.$emit("parentFn");
            }
        }
    }
</script>
3. 多级父子组件通信
多层级父子组件之间通信,一级一级向上传递参数太繁琐,这时可以通过while等循环,不断向上遍历,直到找到目标父组件,就在对应的组件上触发事件。
src/mixins/emitter.js
1
2
3
4
5
6
7
8
9
10
11
12
13
14
15
16
17
18
19
20
21
22
23
24
25
26
27
28
29
30
31
32
33
function broadcast(componentName, eventName, params) {
  this.$children.forEach(child => {
    var name = child.$options.componentName;

    if (name === componentName) {
      child.$emit.apply(child, [eventName].concat(params));
    } else {
      broadcast.apply(child, [componentName, eventName].concat([params]));
    }
  });
}
export default {
  methods: {
    dispatch(componentName, eventName, params) {
      var parent = this.$parent || this.$root;
      var name = parent.$options.componentName;

      while (parent && (!name || name !== componentName)) {
        parent = parent.$parent;

        if (parent) {
          name = parent.$options.componentName;
        }
      }
      if (parent) {
        parent.$emit.apply(parent, [eventName].concat(params));
      }
    },
    broadcast(componentName, eventName, params) {
      broadcast.call(this, componentName, eventName, params);
    }
  }
};
child.vue
1
2
3
4
5
 <f1>
   <c1>
    <c2></c2>
   </c1>
 </f1>
c2.vue
1
2
3
4
5
6
7
8
9
10
11
12
13
14
15
16
17
18
 <template>
     <section>
     <button type="button" name="button" @click="dispatchTest">点击一下,就可以</button>
   </section>
 </template>
<script type="text/javascript">
    import Emitter from "../mixins/emitter";
    export default {
        name: "c2",
        mixins: [Emitter],
        componentName:'c2',
        methods: {
        dispatchTest() {
            this.dispatch('f1', 'listenerToC1', false);
            }
        }
    }
</script>
f1.vue
1
2
3
4
5
6
7
8
9
10
11
12
13
14
15
16
17
18
19
20
<template type="html">
  <div class="outBox-class">
    <slot>
    </slot>
  </div>
</template>

<script type="text/javascript">
import Emitter from "../mixins/emitter";
export default {
    name: "f1",
    mixins: [Emitter],
    componentName: 'f1',
    mounted() {
        this.$on("listenerToC1", (value) => {
            alert(value);
        })
    }
}
</script>
12.解决正常引入子组件报未注册组件错误的问题
如下引入子组件:
demo.vue
1
2
3
4
5
6
7
8
9
10
11
<template>
    <confirm-dialog></confirm-dialog>
</template>

import { ConfirmDialog } from './dialogs';
export default {
    components: {
    'confirm-dialog': ConfirmDialog,
    },
    ...
};
[Vue warn]: Unknown custom element: <modal-dialog> - did you register the component correctly? For recursive components, make sure to provide the "name" option.(found in <ConfirmDialog> at ...\src\components\global\dialogs\ConfirmDialog.vue)
解决方法是:import ConfirmDialog from './dialogs';
13.如何在js文件内使用vue-router进行路由跳转
以下是路由文件的内容
router/index.js
1
2
3
4
5
6
7
8
9
10
import Vue from 'vue';
import Router from 'vue-router';

Vue.use(Router);

export default new Router({
  routes: [
    /* ... */
  ],
});
把该路由文件引入到你的目标js文件中,你就可以使用路由了
demo.js
1
2
3
4
5
6
7
import router from "../router"

function GoToPage(){
    router.push("/");// <--- router
}

export default GoToPage
14.绑定事件中如何获取this(即触发事件的元素本身)
只获取当前事件元素,不包括其子元素
demo.js
1
2
3
4
5
6
7
8
9
10
11
12
13
14
<template>
    <div>
        <button @click="change($event)">点击事件</button>
    </div>
</template>
<script>
    export default{
        methods:{
            change(event){
                console.log(event.target);
            }
        }
    }
</script>
只获取当前事件元素,且包括其子元素
demo.js
1
2
3
4
5
6
7
8
9
10
11
12
13
14
<template>
    <div>
        <button @click="change($event)">点击事件</button>
    </div>
</template>
<script>
    export default{
        methods:{
            change(event){
                console.log(event.currentTarget);
            }
        }
    }
</script>
15.使用axios拦截器统一处理所有的http请求和响应
demo.js
1
2
3
4
5
6
7
8
9
axios.defaults.headers.post['Content-Type'] = 'application/x-www-form-urlencoded;';
axios.interceptors.request.use((config) => {
    if (config.url.indexOf('send_msgbynetease/img') < 0) {
        config.data = qs.stringify(config.data);//此处需要引用 qs 用于处理上传图片接口时,需要将图片参数转换格式之后才能请求接口
    }
    return config;
}, (error) => {
    return Promise.reject(error);
});
16.使用路由回退时判断有没有上一个路由
使用vue-router的this.$router.go(-1)可以返回到上一个路由
但在项目中,遇到了一个情况:
尝试过使用window.history.length是否小于等于1来判断,但有时会出现window.history.length与实际情况不符
最后,我想到了一个办法:
demo.vue
1
2
3
4
5
6
7
8
9
10
11
12
13
14
15
16
17
18
19
20
21
22
23
export default {
  data: function() {
      //是否存在上一页路由
      hasLastRouter: false
  },
  beforeRouteEnter(to, from, next) {
    next(vm => {
      // 通过 `vm` 访问组件实例
      if (from && from.name && from.fullPath !== "/") {
        vm.hasLastRouter = true;
      }
    });
  },
  methods:{
      back: function() {
        if (this.hasLastRouter) {
            this.$router.go(-1);
        } else {
            //没有上一页可以返回,做别的处理
        }
    }
  }
}
17.解决element-ui中upload组件使用多个时无法绑定对应的元素
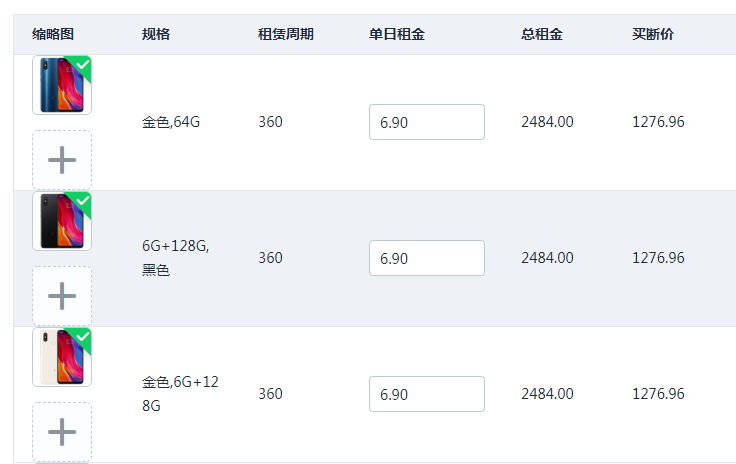
当只需要上传一次上传单张图片时,按照文档来基本没什么问题,但当需要以列表形式上传多张图片时,上传的图片控件就只对第一个有效了。如图所示::on-success="handleAdPicSuccess"和 :on-change="handleAdPicChange"等这些方法中没有能传参的方式。
因此,需要在执行这些方法前传递需要的参数,如下:
demo.vue
1
2
3
4
5
6
7
8
9
10
11
12
13
14
15
16
17
18
19
20
21
22
23
24
25
26
27
28
<template>
    <div>
        <el-table :data="tableData" size="mini">
              <el-table-column label="缩略图" width="110">
                <template slot-scope="scope">
                  <el-upload :action="baseUrl+'/Index/uploadFile'" list-type="picture-card" name="File" :data="data" :limit="1" :on-success="(res,file,fileList)=>{return specImgSuccess(res,file,fileList, scope.$index)}">
                    <i class="el-icon-plus"></i>
                  </el-upload>
                </template>
              </el-table-column>
        </el-table>
    </div>
</template>
export default {
  data: function() {
      tableData: []
  },
  methods:{
      specImgSuccess(response, file, fileList, index) {
        this.tableData[index].img.push({
            name: "",
            url: response.Data.local,
            fileName: response.Data.fileName
        });
    },
  }
}
18.在data()中如何引用本地静态图片
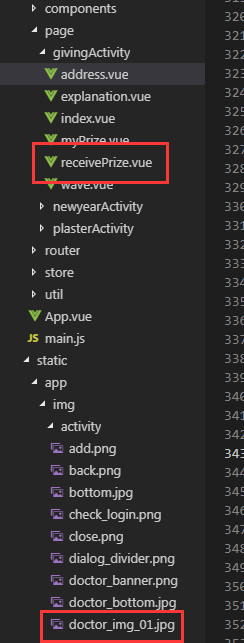
当需要在vue的data()中引用本地静态图片时,项目结构如下图所示:
demo.js
1
2
3
4
5
6
7
8
<img :src="item.url" v-for="item in list"/>
data(){
    list:[
        {
            url: require("../../../static/app/img/activity/doctor_img_01.jpg")
        }
    ]
}
css中的background-image属性引用背景图片时也一样
19.添加/修改数组/对象的属性值,没有触发视图更新的问题
使用this.$set(object, "属性值", 赋值内容);即可